Here’s the truth nobody tells you: starting an online store is nowhere near as glamorous as the internet gurus make it sound. People love to hype it up like you’ll launch a Shopify store today and wake up to six figures tomorrow. Spoiler alert—you won’t. And that’s exactly why most new shop proprietors fail before they ever make their first sale.
But right here’s the twist.
Ecommerce is exploding. Shopify is one of the most effective ecommerce structures on this planet. And sure, everyday people—college students, moms, side hustlers, even brick-and-mortar store proprietors—are turning it into real income each single day. The difference? They’re doing it the right way, not the fantasy way.
Because launching a Shopify store isn’t about throwing up a few products and praying for miracles. It takes planning. It takes strategy. It takes understanding how ecommerce actually works. If you skip the fundamentals, your store won’t stand a chance. But if you get them right? You’re already ahead of 90% of new sellers.
This guide isn’t here to sugarcoat things or sell a dream. It’s here at hand for you: the real steps—twelve sensible, actionable ones—plus the reality about fees, expenses, lawful requirements, and the length of time it simply takes to construct a store that doesn’t just look top-notch… but also converts.
By the time you finish reading, you’ll have the entirety you want to build a Shopify store that’s truly set up for fulfillment—no longer hype, now not wish, but rather a strong basis that works.
Understanding the Basics: What You Need Before Starting
Before diving into the setup technique, it’s critical to get clean at the fundamentals. Preparing these factors in advance of time can prevent hours of work and help you build a store that is aligned with your business dreams.
1. A Business Idea
Knowing what you want to sell is the first step. This could be:
- Physical products
- Digital goods
- Dropshipping items
- Print-on-demand product
- Services
2. Market & Competitor Research
Know who you’re selling to and what they need. Also, what they can pay and who else offers similar solutions. This helps you position your brand effectively.
3. Product Sources
Choose how you’ll take inventory:
- Handmade items
- Wholesale suppliers
- Manufacturer partnerships
- Dropshipping suppliers like Oberlo, Spocket, or AliExpress
4. Branding Essentials
Have the following ready:
- Store name
- Logo
- Brand colors
- Domain name ideas
5. Business Email
A professional email (e.g., info@yourbrand.com) adds credibility when communicating with customers.
How to setup a Shopify Store in 12 Steps
Setting up a Shopify store is easier than most people assume. You don’t need coding abilities, layout knowledge, or fancy tech information. Just follow these steps one at a time, and also you’ll have your shop up and running very quickly.
Here’s a simple breakdown of what you want to do.
Step 1. Create Your Shopify Account
To start your Shopify journey, visit Shopify.com and sign up for a free trial.
Here’s what to do after you’re on the website:
- Enter your email and create a password.
- Shopify will ask some questions on your enterprise (new keep, current shop, what you propose to sell, and so forth).
- Answer them honestly—they help Shopify install your dashboard better.
After that, you’ll land inside your Shopify admin panel; that’s your principal dashboard.
Super simple, nothing complicated.

Step 2. Pick a Store Name
Your store needs a name before you can move forward.
To do this:
- You’ll need a shop name to continue.
- Choose one that suits your emblem or niche.
- It will appear on your brief Shopify URL (as an example, storename.Myshopify.Com).
- You can add your very own area later, so it doesn’t have to be ideal proper now.
- Keep it simple and remarkable — after you publish it, Shopify sets it as your default store name.

Step 3. Customize Your Store Theme
This is where the store initiates a feeling like yours.
Tail these steps:
- Go to Online Store > Themes in Shopify.
- Browse free or paid themes (free ones are great to start with).
- Click Customize to edit your theme.
Inside the editor, you can:
- Add banners
- Change colors
- Move sections around
- Upload your logo
- Adjust fonts and button styles
The drag-and-drop editor is really easy to work with, even in case you’re new to this.
Take a little time to adjust things till your store appears clean and polished.

Step 4. Add Your Products
Time to showcase what you’re selling.
To add products:
- Go to Products > Add product.
- Upload high-quality photos (this matters a lot).
- Enter a catchy title.
- Write a clear, helpful product description.
- Add pricing and cost details.
- Add SKU numbers if you have them.
- Include versions like size, colors, patterns, and many others.
Add your systems one after the other, or import an entire listing the use of a CSV.

Step 5. Organize Products into Collections
Collections help your store feel organized and easy to shop.
To set them up:
- Go to Products > Collections.
- Click Create collection.
- Pick a name in your collection that matches the vibe or category.
- After that, you may drop in products manually or set filters so Shopify does the sorting for you.
Collections act like aisles in a store.
Customers find products faster, which means more chances of a sale.

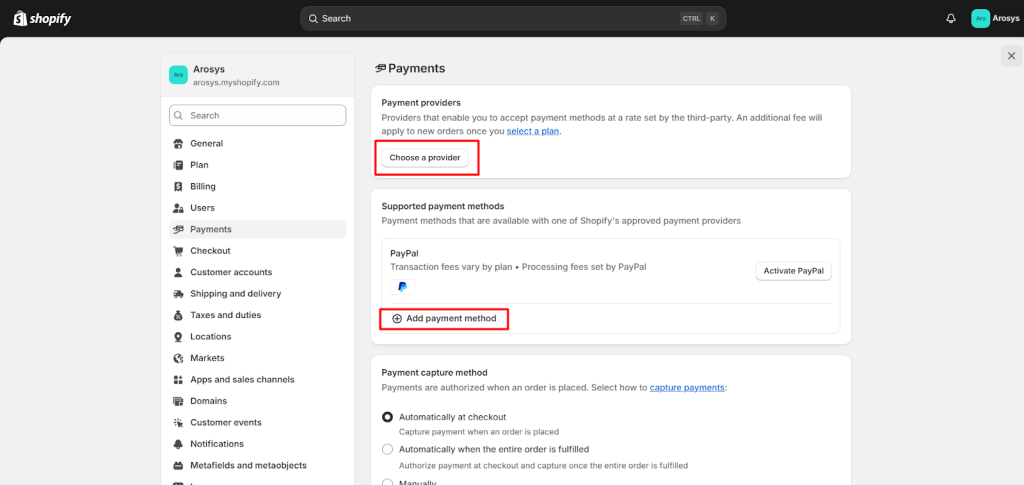
Step 6. Set Up Payment Gateways
You need to get paid—so set up payments next.
Do this:
- Go to Settings > Payments.
- Choose your payment options.
- Shopify Payments is the perfect solution and lets you receive payments instantly.
- You can also connect PayPal, Stripe, or Cash on Delivery if supported.
Once connected:
- Fill in your business details.
- Add your payout bank account.
- Check your transaction fees.
Make sure you’re supplying payment techniques that your clients prefer.
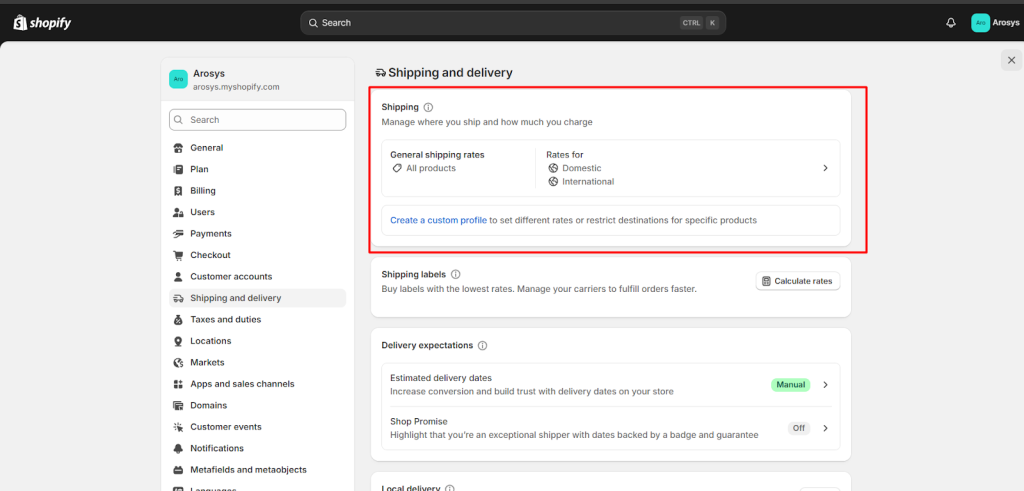
Step 7. Set Up Shipping Zones and Rates
This is the step you already saw in detail, but here it is again in the same tone:
- Go to Settings > Shipping and delivery.
- Choose the shipping profile you want to edit.
- Click Manage.
Then:
- Click Add rate.
- Set the name of the shipping rate and how much it costs.
- Add optional conditions (price-based, weight-based, etc.).
- If you’re using calculated rates, you can mark them up or discount them.
- Click Done → Save.
If you use Shopify Payments, you can even set shipping in local currencies.
Step 8. Add Essential Store Pages
Your store needs basic pages that customers look for.
To create them:
- Go to Online Store > Pages.
- Click Add page.
- Add the principal pages you save requirements—About Us, Contact Us, and all your policy pages.
Shopify already has templates for the prison stuff; simply tweak the information in order that they’re accurate for your business.
These pages help build trust and protect your store legally.

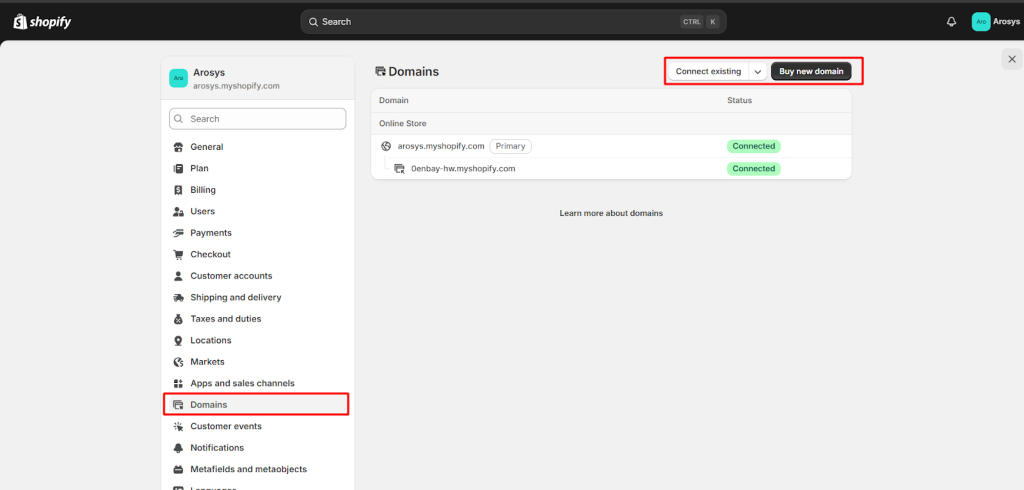
Step 9. Connect or Buy Your Domain Name
A custom domain makes your store look authorized.
Here’s how to get it to work:
- Go to Settings > Domains.
- Click Buy new domain if you want to purchase one directly from Shopify.
- Or click Connect existing domain if you already own one elsewhere.
Once connected, your store will look like:
yourbrand.com instead of yourbrand.myshopify.com
That small change boosts trust instantly.
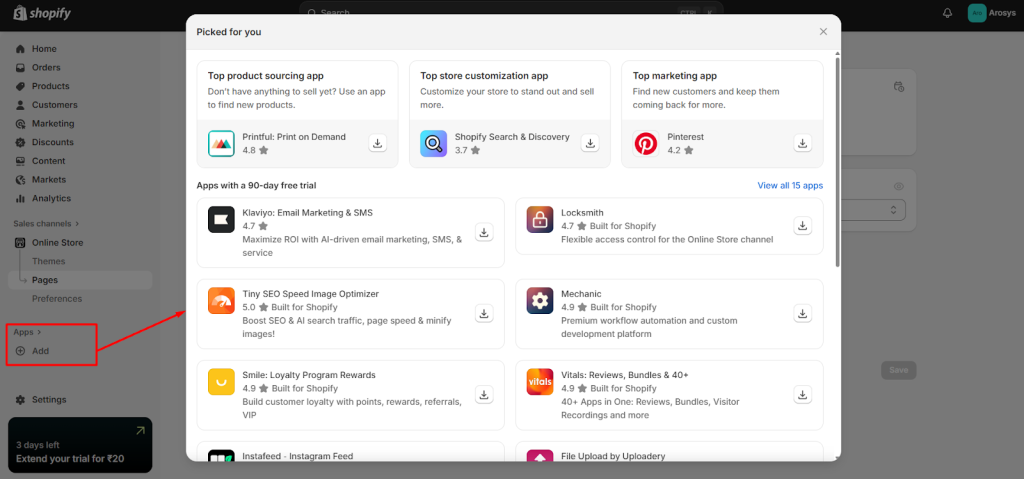
Step 10. Install Helpful Apps
Apps help you add more features to your store without coding.
To install apps:
- Click on the Shopify App Store.
- Search for apps you require like email marketing, reviews, SEO tools, upsell addons, etc.
- Click Add app and follow installation steps.
Just remember:
Don’t deploy too many apps—too many can gradually slow down your shop.
Start with the necessities.
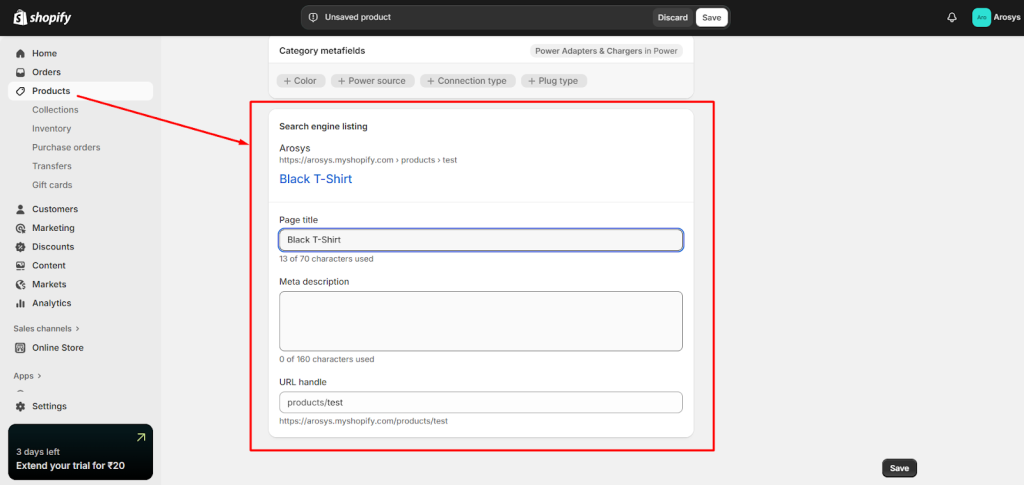
Step 11. Optimize Your Store for SEO
SEO assists your store in showing up on Google and brings free traffic.
To optimize:
- Go to each product and collection page.
- Add full relevant keywords titles and outlines.
- Fill out the meta title and meta description.
- Compress your pictures to improve loading speed.
- Keep URLs simple such as no bizarre characters or long strings.
Think of search engine marketing as giving Google a clear roadmap of what your store sells.
Step 12. Launch Your Store
You’re almost there—just the final steps left.
Before launching:
- Place a test order to check the process.
- Make sure certain bills, shipping, and taxes are set up.
- Remove the storefront password.
To go live:
- Go to Online Store > Preferences.
- Scroll to Password Protection.
- Turn it off.
- Click Save.
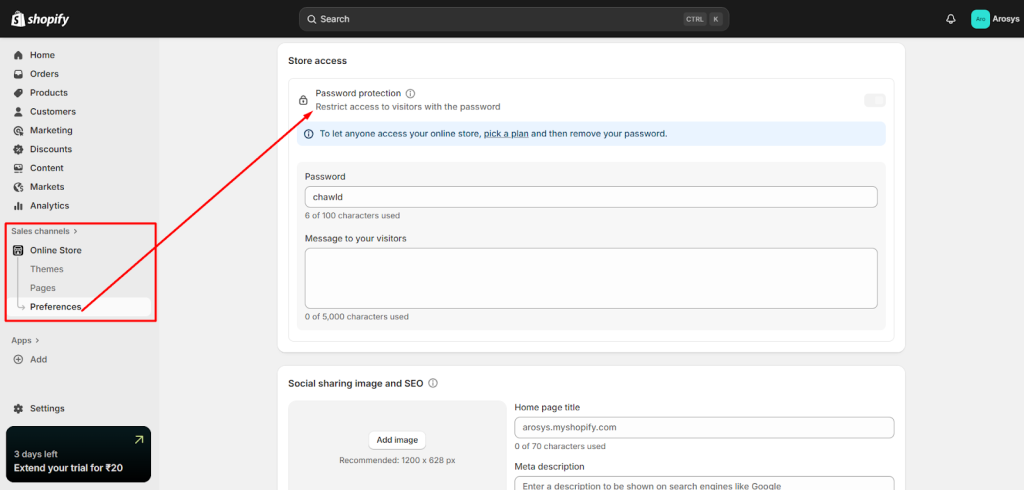
Congratulations, your Shopify store is officially live!
How Much Does It Cost to Build a Shopify Store?
Starting a Shopify store entails both fixed and optional prices. Here’s what you could count on.
1. Shopify Subscription Plans
- Basic Plan at $39/month
- Shopify Plan: $105/month
- Advanced Plan: $399/month
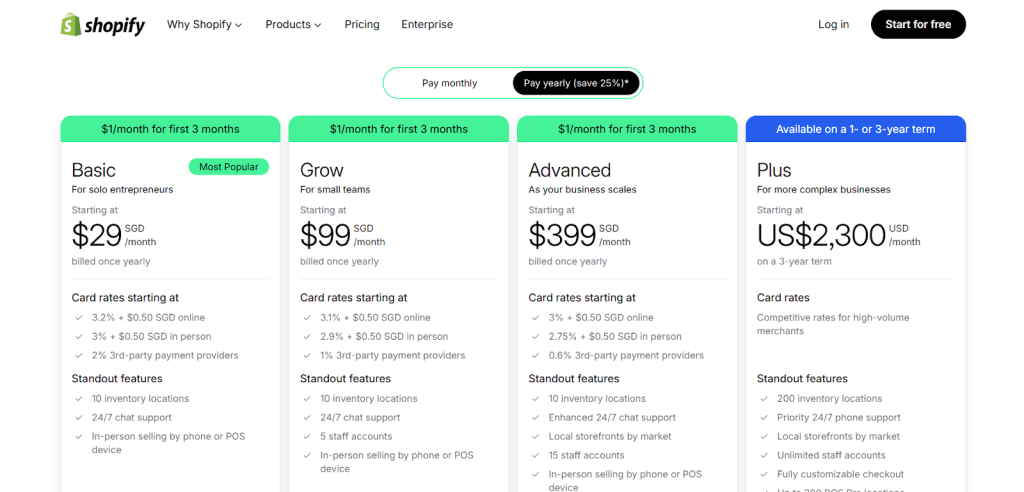
Most beginners start with the Basic plan.
2. Domain Name
Around $10–$20 per year, depending on the provider.
3. Premium Themes (Optional)
Free themes are good for beginners, but premium themes cost $150–$350 and offer advanced features.
4. Apps and Integrations
Some apps are free, but premium apps may cost:
- $5–$30/month per app
- Some enterprise apps go up to $100/month
5. Marketing & Advertising Costs
Depending on your strategy:
- Google Ads & Facebook Ads = $100+ to start
- Influencer marketing = $50–$500+
- Email marketing platforms = $10–$30 per month
6. Inventory Costs (If applicable)
If you’re not dropshipping, you need initial stock:
- $200–$1000+ depending on product type
Typical Total Startup Cost
Beginners normally spend $100–$500 in advance, with the exception of advertisements. With advertising included, the price can variety from $500–$2500.
How Much Does Shopify Charge Per Sale?
Shopify charges transaction fees depending on your plan and payment gateway.
1. Shopify Payments Fees
If you use Shopify Payments:
- 2.9% + 30¢ per transaction (Basic plan)
- 2.7% + 30¢ (Shopify plan)
- 2.4% + 30¢ (Advanced plan)
2. Extra Transaction Fees in case not using Shopify Payments
Shopify charges:
- 2% on Basic plan
- 1% on Shopify plan
- 0.5% on Advanced plan
3. Credit Card Fees
These are based on customer payment methods (Visa, Mastercard, etc.) and are included in your per-transaction fee.
4. Currency Conversion Fees
Shopify charges about 1.5–2% for foreign money conversions on worldwide purchases.
How Long Does It Take to Set Up a Shopify Store?
It really depends on your setup. More products or a more complex store will generally take longer.
1. Basic Store Setup
For a simple store with 5–10 products:
- 1–3 days
2. Medium-Sized Store
If you need customizations, apps, and multiple collections:
- 1–2 weeks
3. Complex or Large Store
For custom coding, advanced SEO, and heavy content:
- 3–6 weeks
Factors Affecting Timeline
- Product preparation
- Branding decisions
- Content writing
- Shipping & fulfillment setup
- Custom design elements
If you’re prepared, a fully functional store can go live very quickly.
What Are the Legal Requirements for Your Shopify Store?
There is more than one legal step you’ll need to take before your store goes live. Don’t worry, they’re easy.
1. Business Registration
Depending on your area, you may require:
- Single proprietorship
- LLC
- Partnership registration
2. Tax Registration
You may need:
- GST or VAT number
- EIN (for US-based businesses)
- State sales tax permits
Shopify also has built-in tax automation tools.
3. Legal Policies
Every store must have:
- Privacy Policy
- Refund & Returns Policy
- Terms & Conditions
- Shipping Policy
These protect both you and the customer.
4. Payment & Data Security Compliance
Shopify is PCI compliant, but make sure you:
- Use secure apps
- Avoid storing customer credit card details manually
- Enable SSL certificates (Shopify does this automatically)
5. Product Compliance
Some niches like cosmetics, supplements, or electronics need:
- FDA or regulatory approval
- Safety compliance certificates
- Age restrictions
6. Copyright & Trademark Rules
Avoid:
- Using copyrighted images
- Selling counterfeit products
- Using trademarked brand names without permission
Final Thought
Starting a Shopify store is in reality one of the handiest approaches to get an internet business off the ground. You don’t need to be terrific technically or understand a way to code. Shopify offers you sufficient tools to set things up smoothly, and after you comply with the fundamental steps, you’ll comprehend it’s no longer as intimidating as it seems.
After you go through the setup guide, have a clear idea of the expenses, apprehend things like expenses and shipping, and make sure your save is legally exact to move, you’re already in a more potent role than maximum beginners. But here’s the thing—launching the store is just step one. Growing it, improving it, and actually turning it into a brand people trust… that part takes some planning, patience, and a bit of trial and error.
And if you’re thinking, “I want to start, but I don’t want to mess it up,” that’s completely normal. A lot of business owners feel the same way in the beginning.
If you need things completed the right way from the start—without all of the headaches—you may genuinely work with a Shopify development company and let them deal with the technical aspect whilst you concentrate on your products and customers.